
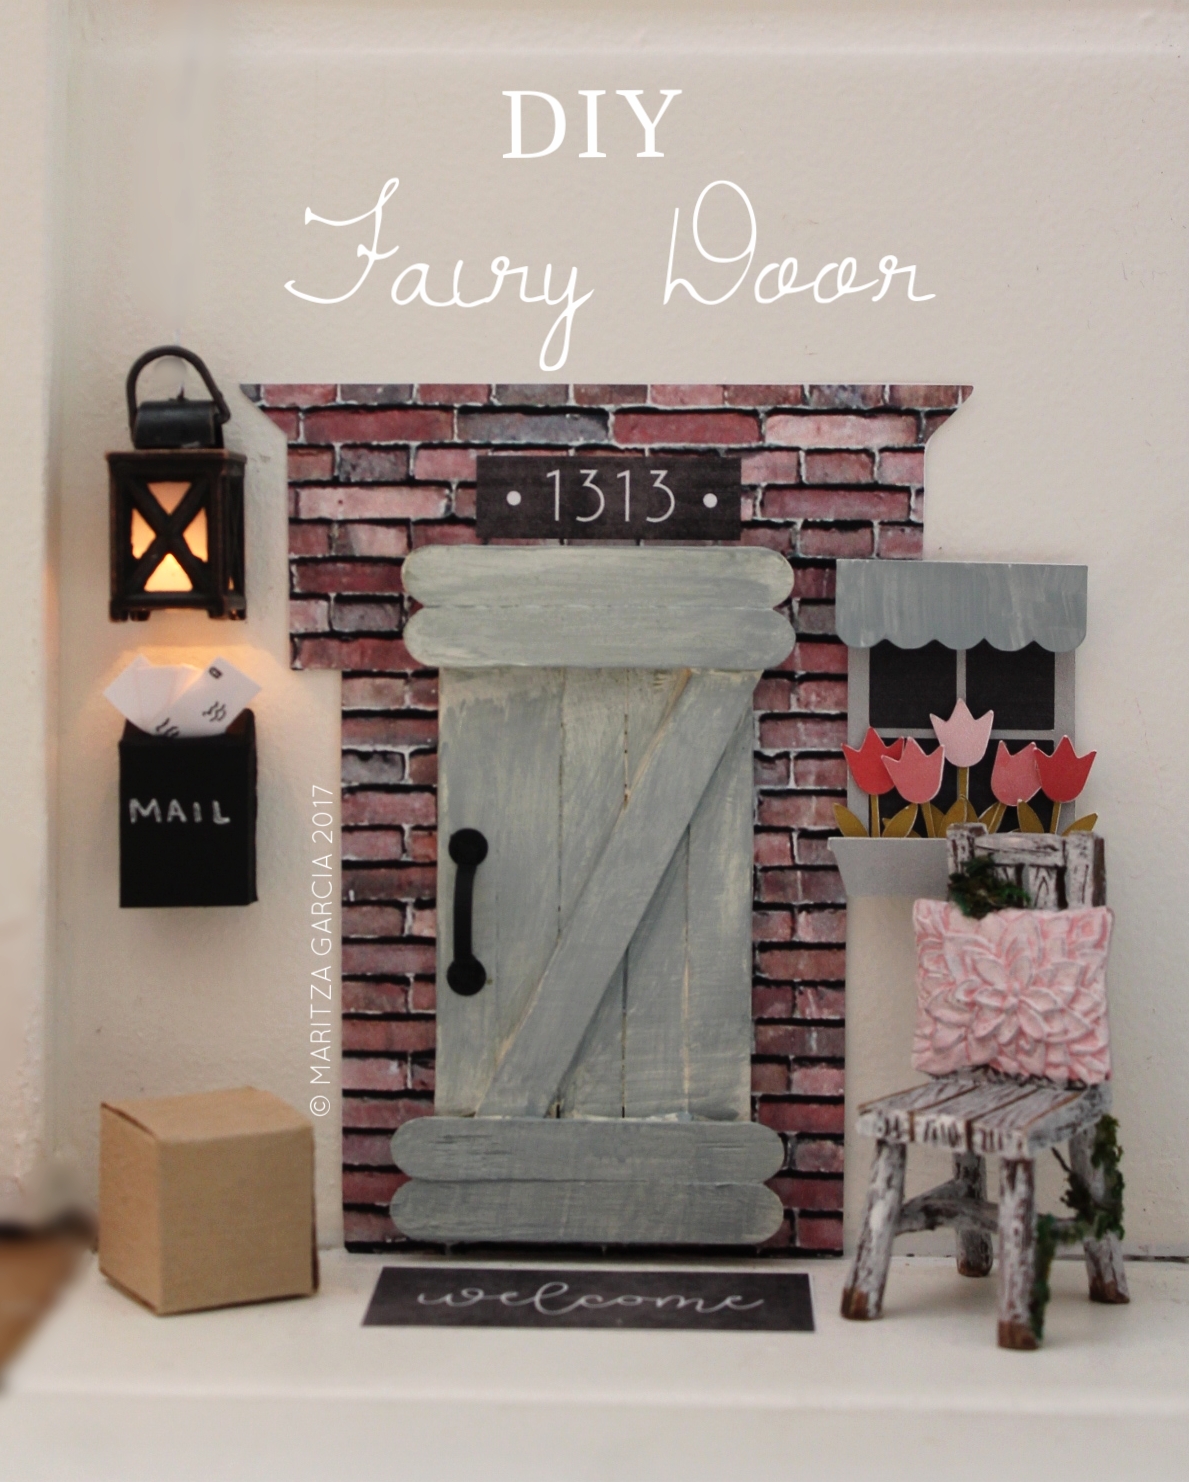
DIY Fairy Door
DIY Fairy Door | How to Create Tiny Fairy Doors | by maritzagarcia.website
Who's ready to get crafty? I know I am. But. Before we get our fingers sticky. I would like to thank you for taking a few moments out of your day to visit with me. Really, nothing makes me happier.
Now, where were we? Aha, right! Fairy Doors and such. Yay! For me. Nothing screams SPRING-TIME more than fairy gardens. Whether it be indoors or out. This my friends is something I think every parent. Cool uncle/auntie. Godparent or Grandparent should consider making. Because best of all! This project doubles as a tooth fairy doorway.


Glue Gun.
Popsicle Sticks.
Hole Punch.
Scissors.
Glue Stick.
Cardstock: Brick Wall Cardstock in Red Brick Wall, plus Black andWhite cardstock.
Clear Tape.
Miniature Fairy Garden Supplies: Fairy Garden Chair and Mini Lantern.
Silhouette Cameo.
Window Pane Gift Bag [ Note: I only used the window ] via Silhouette Design Store.
Paint Brushes and Paint.
Project Time : 2 hours

Instructions
S T E P O N E.
Start by warming up your glue gun, you will need 6 popsicle sticks in size 5 1/2" and 4 popsicle sticks in size 2 1/2". Once the glue is hot, lay five 5 1/2" popsicle sticks vertically side by side on top of your work surface. Next, add hot glue to your sixth, 5 1/2" popsicle stick and place on top of all five 5 1/2" popsicle sticks at a 50 degree angle, press down for a few seconds. Take the last four 2 1/2" popsicle sticks, add hot glue to the top and bottom of all 5 1/2" vertical popsicle sticks, and place each 2 1/2" popsicle sticks horizontally two on top, and two on the bottom.

S T E P T W O.
Paint door in your color choice, set aside and let dry for about 30 minutes. Next using black cardstock paper, hole punch two circles and hand cut a small strip to make a door handle. Using the same cardstock, make a mailbox, doormat and an over door house number.
S T E P T H R E E.
Cut brick cardstock paper to create a doorway casing for your fairy door, I made mine in a T shape. Using white cardstock, cut tiny rectangles to make tiny envelopes.

S T E P F O U R.
If you don't own a cutting machine, you can either hand cut a window pane or use left over popsicle sticks to create a small window frame, and add miniature flower stickers to create a floral window box.
S T E P F I V E.
Lastly, the finishing touches. Find the perfect spot for your fairy door, (ours is off to the far left bottom side of our fairplace and it looks like it just belongs there). Once you find where you want your fairy door, add double sided tape to the back of your fairy door, next attach to your brick wall cardstock, followed by adding your over head house number, window pane, mailbox, and lantern, and don't forget the tiny chair.

Psst... want to stay in the loop and get the latest scoop on DIY's or News. Make sure to sign up and subscribe or follow along on Instagram, Pinterest or Bloglovin'. As always, we hope you give this DIY a try.
Want to share this project with us on INSTAGRAM? Use hashtag knotjustpaperdiy . Until next time - Happy crafting!
- Maritza.